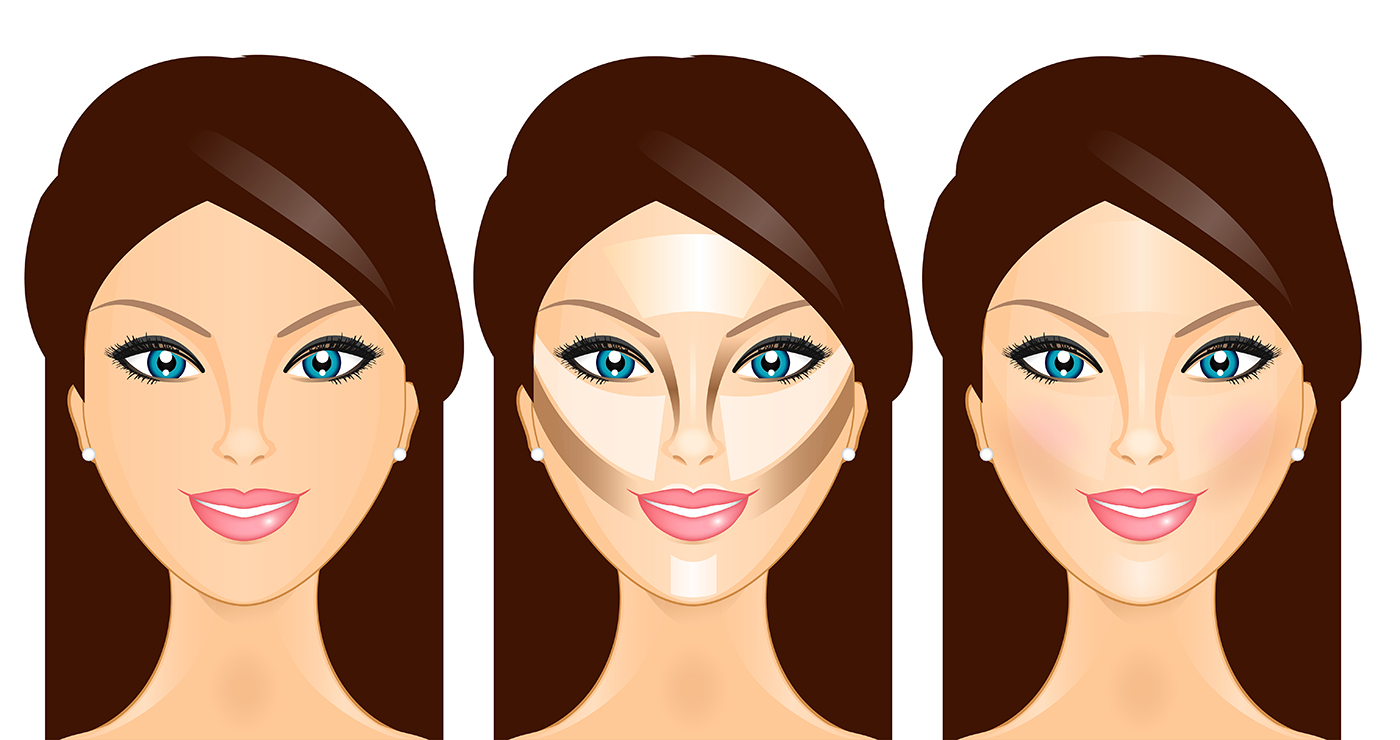
“Contouring makes your face look warmer, thinner, and younger instantly,” says makeup pro Mario Dedivanovic, who practices what he preaches on Kim Kardashian, a frequent client. “The key is not overdoing it—you can always add more color, but it’s much harder to take it off. And blend like crazy!”
Here’s how to sculpt and define in under ten minutes:
How-To
Cheeks: Use a foundation that’s a shade or two darker under your cheekbones. “Find the hollows of your cheeks by sucking them in a little. Then use light circular motions starting at the tip of your ear and coming in (working on a slight curve) until about the center of your eye,” says Chevy Chase makeup artist Myken Garcia, who uses the Beautyblender applicator to make sure the look is seamless. Add a foundation that’s a shade or two lighter than your actual shade above the cheekbone.
Nose: Apply the contouring shade along the sides of your nose and under the tip, and the highlighter on the bridge. Your fingers are the best tool here, since they’ll give you precision and warmth to let the color glide on smoothly.
Mouth: A touch of highlighter right above the lips defines the cupid’s bow and makes lips look fuller.
Eyes: Apply highlighter to your lids. Then swipe contouring color in the crease and along your lower lashline. Apply white eyeliner to your lower inner lashline to open up the eye and make it appear brighter.
Chin: A dab of highlighting color will make it appear more round and also help your face to appear longer (avoid this step if you have a naturally longer face). Swipe the same highlighter along the jawline for a more sculpted look.
Finishing touch: After you’ve blended and blended until you just can’t blend anymore, Dedivanovic recommends finishing with a bronzer with a hint of shimmer. “Sweep it onto the corners of the forehead and into the hair line (not across the forehead), the hollows of the cheeks, and the center of the neck,” he says. “You want to create a triangle of light on the face so it looks dewy and radiant.” Tip: Don’t use a big, fluffy brush; you need a bit more precision to hit the right spots.
Do
Learn the basics. There are two key terms for contouring: Shading, which makes an area of skin recede from view, and highlighting, which brings a feature forward. Your shading color will be darker; your highlighting color will be lighter. Where you put the shading and highlights depends on your unique features and face shape.
Start with cream-based products (like foundation). These are easier to blend than powders, says Garcia, so the effect is more natural. Once you’re confident in your blending abilities, you can use bronzer to finish the look.
Don’t
Use products with shine. Foundations with shimmer won’t look natural on the skin. (Your goal: to make a convincing case that you rolled out of bed looking like this.)
Over-highlight the apples of your cheeks. A common novice mistake, it’s also the most glaring since that’s the area that pops every time you smile.
Tools of the Trade
Kat Von D Shade + Light Contour Palette ($46)
An easy-to-use mix of taupe and beige options that will work on most complexions.

Sephora Deluxe Anti-Bacterial Brush Set ($60)
A good set of brushes goes a long way when creating contour perfection. These anti-bacterial ones are a safe bet.

Sephora Collection Precision Sponge ($7)
An essential component for blending shades: the squishable, dome-shaped sponge.


